The General tab on an AP Vendor account is used to set defaults and provide additional information about the account. The defaults that can be set range from the Site ID to how invoice discounts will be calculated. Provide any additional purchasing contact information and define any needed account numbers.
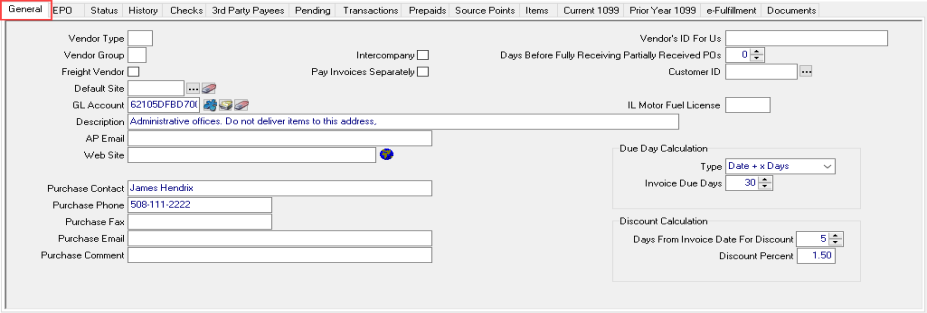
Vendor Type is a two character field that accepts a user defined alpha-numeric value. Vendor Type allows you to group vendor accounts for ease of payment through Range of Vendor checks.
Vendor Group is primarily used as a secondary sort function on the Vendor Aging report. Enter a one character alpha-numeric ID.
If Freight Vendor is selected, the Vendor will populate as the Third Party Freight Vendor on Commodities > Access Scale Tickets.
Enter the Default Site ID associated with the AP Vendor account or select the search button  .
.
Select any GL Account number associated with this account which most commonly used with expense GL accounts. When creating or editing an existing account, select
 - Select a GL subaccount
 - Select a GL account
 - Remove the current selection.
Enter a brief Description about the account in this 70 character alpha-numeric field. This information is visible in the Browse AP Vendors window.
Any AP Email address for the vendor Accounts Payable department contact.
Enter the vendor Website URL. Select the globe icon to launch the vendor website in the current browser.
Name of Purchase Contact in vendors Purchasing department.
Purchase Phone for the purchase contact.
Purchase Fax displays any Fax number for purchase contact.
Enter the Purchase Email address of the Purchase Contact. If Microsoft Outlook is installed, this email address automatically populates as the recipient when generating Vendor emails for Purchase and Direct Orders which are included as an attachment.
Enter a Purchase Comment in this 50 character alpha-numeric field.
Some locations will have the option to flag the vendor account as Paid by Local Entity. When selected, all invoices for the Vendor will be paid by the location instead of by a corporate entity. This option may not be available at your location.
Select Intercompany if the vendor will be used for intercompany transactions and will not be issued a check for payment.
Choose Pay Invoices Separately to have the checks generated separately for the vendor. This will exclude the vendor from the Range of Vendor Checks option. Invoices entered that have been flagged as Pay Separately the Due Amount on the Transactions tab highlighted in blue.
Enter your account number, Vendor’s ID for Us, with this vendor. This information is visible when the vendor is selected in the Browse AP Vendors window and will print on Accounts Payable checks.
Days Before Fully Receiving Partially Received PO’s is used to set the number of days a partially received PO will remain open before being marked fully received. The default value is zero on AP Vendor accounts with any value set on a PO taking precedence but any value entered is set as the default on the PO. The Adjust PO Quantities SRV task runs nightly closing all PO’s with a minimum of one receipt when the number of days in the Days Before Fully Receiving Partially Received PO’s has elapsed.
Provide any Customer ID that may be affiliated with the Vendor account to allow transferring AP balances on the Vendor account as a credit to satisfy any Accounts Receivable balance on the customer account.
Due Day Calculation

Select a Due Day Calculation Type
- Day of Next Month– Set the specific day of the following month invoices are due. Select the Invoice Date to indicate the day of the month. Example: All invoices are due on the 15th of the month. Select Day of Next Month for Type and set Invoice Date to 15.
- Date + x days– Calculates the Invoice Due date by using invoice date plus the number of days indicated in Invoice Due Days. Example: Invoice Due Days is set to five (5), invoice date is January 5, using the Invoice Due Days of five (5) would set the due date as January 10.
- Week from Monday– Invoice Due date is calculated by selecting the next Monday after the invoice date and setting the due date as the Monday of the next week.
If offered, use Discount Calculation to automate calculating discounts for invoices paid within the Vendors discount period.
If the Due Day Calculation is Day of Next Month, the Discount Calculation available is
- Day of Month for Discount- Scroll up or down to select the Day of the month the invoice must be paid prior to for the discount.
- Discount Percent- Enter the discount percentage applied to the invoice balance.
If the Due Day Calculation is Date + x Days, the Discount Calculation available is
- Days from Invoice Date for Discount- Scroll up or down to select the number of days from the invoice date the discount is available.
- Discount Percent- Enter the default discount percentage applied to the invoice balance. Invoice specific discounts can be added during invoice entry.
Select Save to create a new AP Vendor account or accept any changes. New accounts are operational and can be used in Purchasing and Accounts Payable.